Selecting Lip Needle Configurations for PMU
A lip blush result can look soft and effortless only when the artist has made highly deliberate choices before pigment touches the skin. Selecting lip needle configurations affects the way you build a border, distribute color through the vermilion, control trauma, and keep the appointment moving at a comfortable pace. The right cartridge is not simply the one that puts down the most pigment. It is the one that gives you predictable saturation for that client’s lip tissue, treatment plan, and healed-color goal.
Start With the Result You Need to Build
Needle selection should follow your technique, not lead it. A defined lipstick effect, a sheer watercolor blush, neutralization work, and a mature-lip refresh all ask something different of the cartridge. When artists use one favorite configuration for every lip service, they can still create beautiful work, but they may be giving up efficiency or asking too much of the skin.
Think in treatment zones. The border requires visibility and control. The body of the lip requires even pigment placement with enough coverage to avoid a patchy heal. Cupid’s bow, corners, and areas with uneven texture often need a lighter hand and a more deliberate pass. A configuration that feels excellent for saturation in the center may be too aggressive or too broad for precise edge work.
Your machine, hand speed, voltage, stroke length, pigment viscosity, and stretch all influence the final result as much as the needle grouping. That is why a cartridge cannot be judged by needle count alone. Test new configurations on practice skins, then introduce them carefully into your treatment workflow before making them a standard part of your lip setup.
Selecting Lip Needle Configurations by Treatment Area
Fine round liners for definition and detail
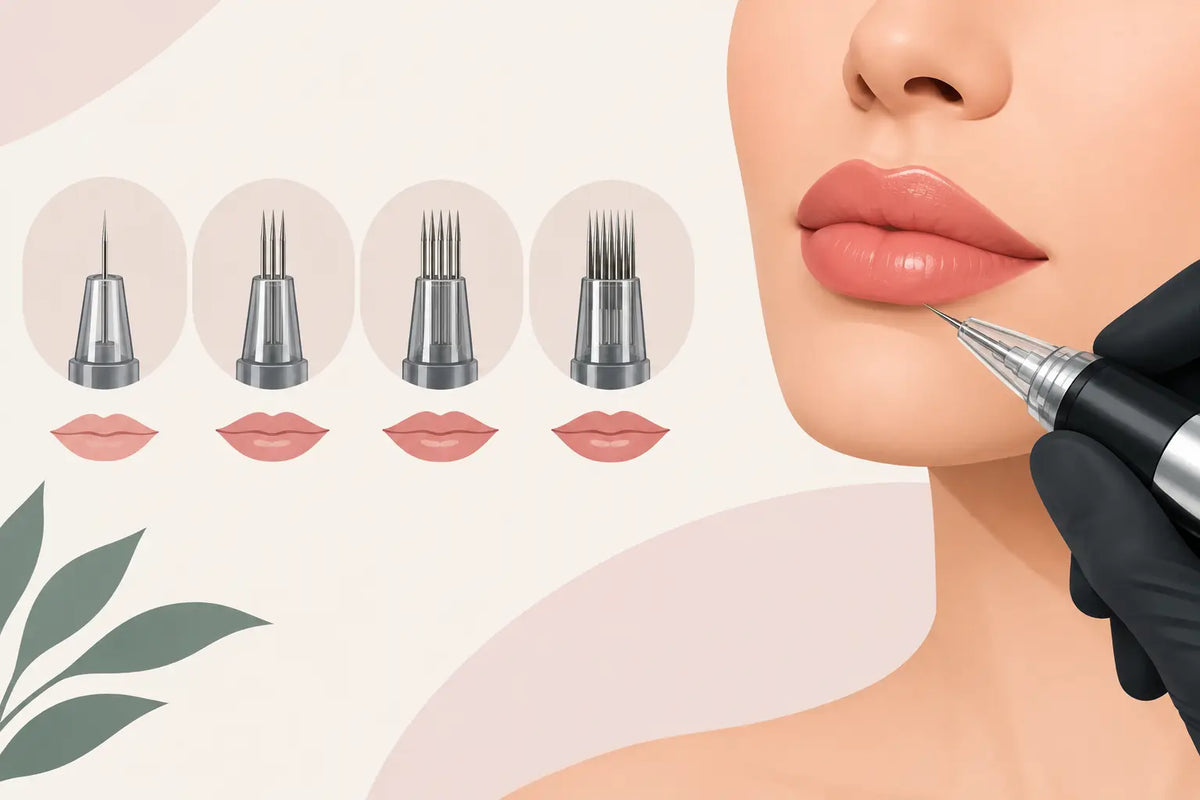
Single-needle and small round liner configurations are the control-focused option. Many artists reach for a 1RL or 3RL style configuration when refining the vermilion border, working the Cupid’s bow, or navigating tight corners. A fine liner can support a clean outline without making the lip appear harsh, provided the artist uses a light, controlled technique and does not repeatedly work the same track.
The trade-off is speed. Fine liners cover less area, so they are not the most efficient choice for saturating the full lip. They can also create visible density differences if the artist uses them for too much fill work. For lip blush, a border built with a small liner should transition softly into the body instead of sitting as a separate, heavily deposited outline.
Needle naming is not perfectly standardized across manufacturers. One brand’s 3RL may have a different feel, taper, spacing, or cartridge housing than another. Compare specs and trial the cartridge rather than assuming two similar labels will perform identically.
Round shaders for controlled soft fill
Round shaders are a practical middle ground for artists who want precision with more coverage. Small round shader groupings can work well around the border and inner lip, especially when you need a soft build rather than a sharply defined line. Their clustered shape allows artists to create compact, controlled pixels of color while moving more efficiently than with a liner.
For many lip blush procedures, a small-to-medium round shader is a dependable workhorse. It can handle detailed areas while still allowing you to layer color through the body of the lip. The key is to maintain a consistent movement pattern and avoid parking the needle in one area. More needles may distribute impact across a slightly larger footprint, but overworking remains overworking.
Magnums and curved magnums for coverage
Magnum-style configurations offer broader coverage and can make the saturation phase faster, particularly for larger lips or fuller lipstick-style finishes. Curved magnums, where the outer needles sit in a soft arc, can feel especially useful when following the natural curvature of the lip. They may help create smooth, even passes without leaving a hard edge from a flat grouping.
That efficiency comes with less forgiveness. A wider configuration can be harder to control at the lip line, in narrow corners, and over uneven or scarred tissue. It also demands a strong understanding of machine settings, pressure, stretch, and pass count. If a client has delicate, dehydrated, mature, or highly textured lips, a large magnum may not be the most skin-respectful starting point.
A common approach is to pair configurations: use a smaller liner or shader for the perimeter and precision zones, then switch to a round shader or curved magnum for the central saturation work. This is not mandatory, but it can give you cleaner control without sacrificing appointment efficiency.
Taper, Diameter, and Needle Polish Change the Feel
Grouping is only part of the decision. Needle diameter and taper influence how the cartridge enters the skin and deposits pigment. Smaller diameters can feel more delicate and can support detailed work, while larger diameters may carry more pigment and create stronger impact. Neither is automatically better for lips.
A longer taper may offer a finer point and a more gradual entry, which can feel useful for soft, controlled layering. A shorter taper may deliver pigment differently and can suit artists who prefer a more direct saturation response. The correct choice depends on your hand, your machine, and the client’s tissue. A configuration that gives one artist clean, airy pixels may feel sluggish or overly sharp in another artist’s setup.
High-quality, well-polished needles matter. Consistent manufacturing supports smoother movement, reliable pigment flow, and a more predictable experience from cartridge to cartridge. For client-facing work, use sterile, single-use cartridges from professional PMU and tattoo suppliers, and verify packaging integrity before every procedure.
Match the Cartridge to Lip Tissue and Service Type
Healthy, well-prepped lips generally tolerate a different approach than lips with dryness, scar tissue, previous pigment, or uneven tone. Cartridge selection should never be used to force saturation into compromised tissue. If the lips are chapped, inflamed, actively irritated, or unsuitable for treatment, rescheduling is better than trying to compensate with a more aggressive configuration.
For a first-time lip blush client seeking a translucent result, a smaller round shader or carefully used curved magnum may support gradual, even color layering. For neutralization, patience matters more than chasing immediate opacity. The tissue may need thoughtful color correction, conservative passes, and realistic expectations across more than one session.
Mature lips often benefit from a gentle technique and controlled configuration choice. The goal is to work with the texture, not fight it. Fine lines around the border, reduced elasticity, and dryness can make a wide or overly assertive cartridge difficult to manage. Build color slowly, monitor the tissue response, and adjust your plan in real time.
Build a Repeatable Cartridge System
A professional lip setup does not need to include every configuration available. It needs a small, trusted range that covers your most frequent needs and performs consistently with your machine. Many artists keep a precision option, a versatile soft-shading option, and a broader coverage option. From there, they choose based on the client’s lip shape, tissue condition, and desired finish.
Keep notes after each procedure. Record the configuration, diameter, taper, machine settings, pigment brand and formula, number of passes, and healed outcome. Over time, those notes become more valuable than any generic cartridge recommendation. They show you what actually heals well in your hands.
Stocking compatible universal cartridges in the configurations you use most also protects your schedule. Running short on your preferred lip shading cartridge can force an unnecessary technique change midweek. Inkbox Artistry is built by permanent makeup artists for artists, with professional supplies that help keep a working studio prepared for detailed treatment days.
Do Not Let Speed Override Skin Response
The fastest cartridge is not always the most profitable choice if it increases trauma, creates uneven healing, or leads to more correction work later. Watch for swelling, excessive redness, pinpoint bleeding, or changes in how the skin accepts pigment. These are signals to reassess your depth, pressure, speed, stretch, and pass count, not simply to push harder.
Follow your training, local regulations, manufacturer instructions, and studio infection-control protocols. Use fresh disposables for every client, maintain a clean barrier setup, and dispose of used cartridges appropriately. Cartridge selection belongs inside a complete professional system of skin assessment, technique, pigment knowledge, consent, and aftercare.
The strongest lip artists do not rely on a magic needle configuration. They learn what each configuration asks of their hand and what it gives back to the client’s skin. Keep your kit intentional, let healed results guide your buying decisions, and choose the cartridge that helps you create refined color without asking the lips to do more than they should.